Designing sanitary system loop installations
| Product | InstalSystem 5 |
| Type of article | DESIGN APPLICATIONS |
| Source for translation | GOLD Rev. 17.0 |
Scope of lesson
This lesson shows how to create a sanitary system loop installation. The latter is located in a single-family two-storey building with basement.
Modules and program configuration
- InstalSystem 5 software package with the following modules:
- Tap water systems
- Tap water extensions
- Recommended: sanitary system pipe catalogues containing direct U-shaped tap water connection, which guarantees lack of no-flow zones within the system
| Project files
|
Single-family building water installation initial state, isproj Water ring installation in a single-family building , isproj |
| Designed with | InstalSystem 5 Rev. 17.0 |
| Required modules | InstalSystem basis Tap water systems Tap water extensions |
| Project range | Water supply installation |
| Used catalogues |
Steel pipes, medium, DIN 2440 |
| Type of building | residential building with basement three-storey |
| Building structure | Underlay - all plans, dwg |
| Drawings range | Plan views |
| Prepared by | www.instalsoft.com |
| Legal disclaimer | Copying of entire project and of its fragments allowed |
| Calculation results | Tap water installation ring full printout, pdf Tap water installation ring bill components, pdf |
| Drawing results | All storeys, dwg Basement, pdf Groundfloor, pdf Attic, pdf |
Initial state
The initial state file is located in the Project table, and it contains the building graphic structure and radiant sanitary system, which needs to be completed with a loop installation on the storey.
For more information, see: [[{{{link}}}]] Design of water supply system installation
Steps to perform
Turning on the program and project general data configuration
- Turn the program on.
- Load the project file - Single-family building water installation initial state, isproj.
Installation edition
- Select storey No. 1.
- Draw hot and cold water pipe feeds, so that a loop installation is created in room 1.5.
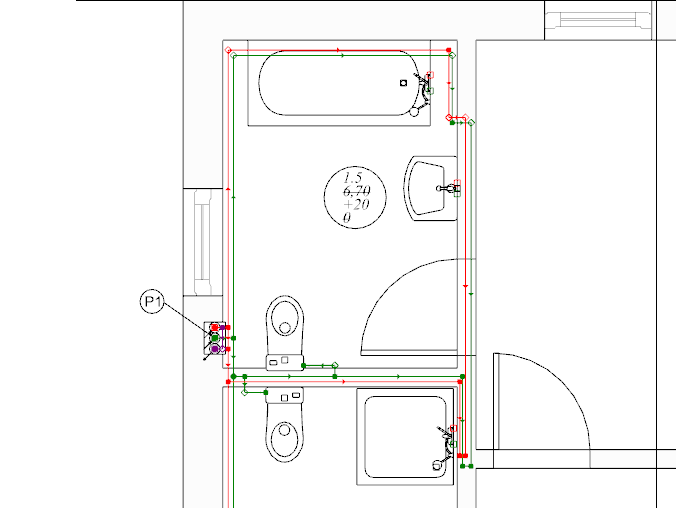
1.Creating a loop installation. - With your mouse, select the area with terminal units and choose Automatically connect terminal units in tee system .
- If needed, modify pipe feed ordinates to evade doors. To do so, insert additional division points for the pipe feed passing through the door opening.
it is necessary to impose a correct ordinate. The correction of imposed values should be verified in the 3D view window.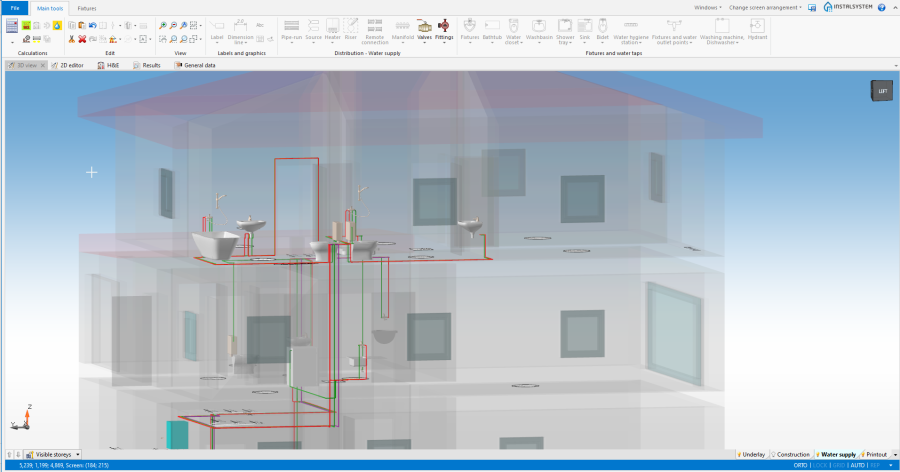
2. Omitting the door opening
- Verify if the circulation circuit has been closed properly on the storey.

3. Closing the circulation circuit on the first storey


Verification of the correctness of installation structure
- Verify correctness of the installation structure using the Check connections function (shortcut: Shift + F2).
- Verify correctness of the installation structure and find collisions using 3D view.
For more information, see: [[{{{link}}}]] Verification of the correctness of installation structure
Calculations and diagnostics
- Perform Water supply systems by clicking on
 located in the Calculations section of the Main tools toolbar.
 - Verify calculation results.
For more information, see: [[{{{link}}}]] Calculations and diagnostics